ステップ1: 作る
説明
2 つの BBC micro:bit を使用して、さまざまな素材の遮音特性に関する科学的調査で音量を測定します。
はじめに
プログラミングガイド
このプロジェクトでは、コンピューター技術を使って、科学実験を行うのに役立つmicro:bitをツールに変えます。
2 つの micro:bit と音源を使用して、さまざまな素材の遮音性をテストします。
センサーが覆われているときでも音量レベルの測定値を読み取ることができるように、センサーは近くに設置された受信機 micro:bit に無線で音量測定値を送信します。
さまざまなコード (下記) を送信機と受信機の micro:bit に転送することも、自分でコーディングして、上記のコーディング ビデオでその仕組みを学ぶこともできます。
送信機 / センサー
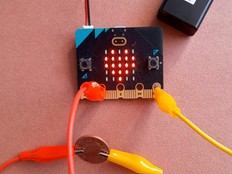
送信用のmicro:bit(micro:bit V2じゃないといけません)は様々な素材で包む音センサーになります。 音量を測定するのにマイクを使い、それを無線で送信します。
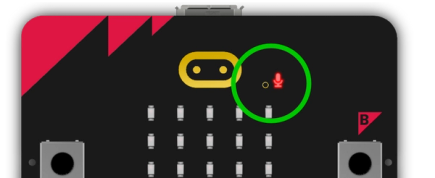
micro:bitの正面にある小さな穴から音を感知します。 テストする材料がこれに触れたり動いたりしていないことを確認してください。そうしないと、サウンド レベルの測定値に影響する可能性があります。 たとえば、さまざまな素材を敷き詰めた段ボール箱の中にセンサー micro:bit を入れると便利です。
音源
音源をセンサーから一定の距離に配置します。 これは、一定の音量で音を出す楽器や携帯電話の着信音など、何でもかまいません。 また、以下の音声ファイルも用意していますので、携帯電話やパソコンから再生できます。
音源が同じ音量とセンサーから同じ距離の音を出すことで、公正なテストが行われます。
受信機
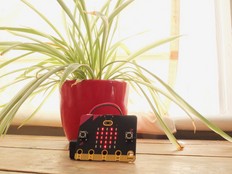
受信機 micro:bit では、音量レベルの測定値を表示します。
送信機から数メートル以内にどこにでも設置できます。
実験の開始
- 送信機 / センサーを試したい素材で囲いましょう。
- 各テストを開始するときに受信機 micro:bit の背面にあるリセット ボタンを押して、サウンド レベルを 0 に戻します。
とても静かにしましょう! - 音源を使って音を鳴らしましょう。
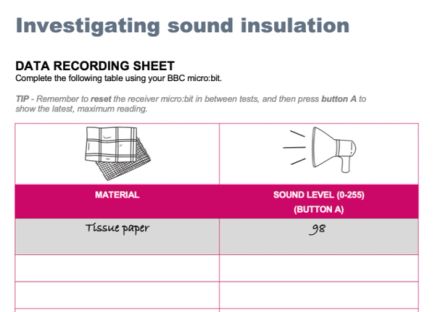
- 受信機のボタン A を押すと、LED ディスプレイに音量レベルが表示されます。 これは 0 (最も静か) から 255 (最も大きい) までのスケールで表示されます。 リセットボタンを押してから測定された最大音量レベルが表示されます。
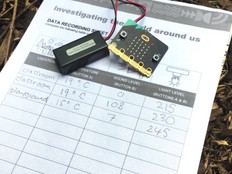
- 私たちのデータ記録シートまたは別の紙に番号を書き留めてください。
- 送信機/センサーを別の素材で包んで実験を繰り返します。
- その後、データを分析して、どの材料が最適な遮音材になるかについて結論を導き出すことができます。
必要なもの
- 2台のmicro:bit. (送信機は micro:bit V2 である必要がありますが、受信機は micro:bit V1 または V2 にすることができます。)
- 最低一つのバッテリーパック(送信機に使うのをおすすめします)
- 安定して音を鳴らす事のできる音源
- 試すための異なる素材、例えば発泡スチロールや荷物を包むプチプチ、段ボールや紙などです。 小さな段ボール箱も役立つでしょう。
- 素材を固定するための粘着テープかゴムバンド
- 音源と送信機の間の距離を測定するための定規やメジャー
- データ記録シートまたは紙とえんぴつ
補足資料
データ記録シートはあなたの測定を記録するのに使えます。そして音声ファイルはスマホやコンピューターから再生して音源として使う事ができます。
ステップ2: プログラムする
送信機 / センサー
受信機
同じ部屋で複数の実験をする
同じ部屋で複数の実験を実行する必要がある場合は、micro:bit の各ペアに固有の無線グループ番号が必要になります。
無線グループを変更するためにプログラムを変更しましょう。 0から255までの任意の数字を無線グループに使う事が出来ます。それぞれのmicro:bitの番号が合うように確認しましょう。